What Is Azure Autoscaling (Azure Autoscale)?
Azure Autoscale (also known as Azure Autoscaling) is a feature in the Microsoft Azure cloud platform that allows applications to automatically adjust resources based on current demand. By dynamically adjusting resources, Azure optimizes performance and cost. Autoscaling accommodates sudden spikes in user traffic, maintaining application responsiveness.
Azure Autoscale automates the management of resources such as virtual machines, supporting cloud optimization strategies by balancing workloads. This process relies on predefined metrics or customizable rules that dictate resource scaling. Azure Autoscale supports both horizontal (adding or removing instances) and vertical scaling (resizing resource allocation on existing instances), allowing adjustments in resource count or capacity of individual resources, respectively.
Benefits of Azure Autoscaling
Autoscaling in Azure provides platform-specific advantages that help applications stay efficient, cost-effective, and responsive to varying workloads. These benefits include:
- Optimized performance: Applications maintain high responsiveness by dynamically adjusting resources based on demand.
- Cost efficiency: Prevents over-provisioning by allocating just the right amount of resources, reducing unnecessary cloud spending.
- Improved reliability: Enhances fault tolerance by automatically scaling instances to handle unexpected spikes, minimizing downtime risks.
- Automation and efficiency: Eliminates manual scaling efforts, allowing teams to focus on application development rather than infrastructure management.
- Flexibility and customization: Supports both predefined and custom scaling rules, enabling organizations to tailor scaling strategies to their needs.
- User experience: Prevents performance degradation during peak times, ensuring consistent service delivery without interruptions.
Key Concepts of Azure Autoscaling
1. Horizontal vs. Vertical Scaling
Horizontal scaling, or scaling out, involves adding more instances to accommodate increased load. It improves capacity and fault tolerance since failures in one instance don’t affect the entire setup. Vertical scaling involves upgrading the existing instance’s capabilities, such as CPU or memory improvements. In Azure, this typically involves VM Scale Sets, and it’s worth noting that vertical scalability often requires manual adjustments.
Both scaling methods serve different needs and constraints. Horizontal scaling is often preferred for applications needing high availability and distributed processing. Vertical scaling might suit workloads benefiting from improved single-instance capabilities with easier updates and deployments.
2. Virtual Machine Scale Sets (VMSS)
Virtual Machine Scale Sets (VMSS) in Azure enable automatic scaling of virtual machines (VMs) to accommodate changing workloads. They support horizontal scaling, allowing applications to maintain performance and availability by dynamically adding or removing VM instances based on demand. VMSS integrates with Azure Load Balancer and Azure Application Gateway to distribute traffic efficiently, ensuring high availability and fault tolerance.
VMSS provides centralized management of VMs, applying uniform configurations, updates, and security policies across all instances. It supports automatic OS image upgrades, ensuring VMs remain up to date with minimal manual intervention. Additionally, VMSS can integrate with Azure Spot Virtual Machines, reducing costs for workloads that can tolerate interruptions.
3. Predictive Autoscaling
Predictive autoscaling in Azure uses machine learning algorithms to anticipate demand based on historical data. This technique proactively adjusts resources to meet future needs and maintain optimal performance. It contrasts with reactive autoscaling, which only responds to real-time changes.
By forecasting resource utilization patterns, predictive autoscaling minimizes latency and maintains a seamless user experience during traffic spikes. Azure’s predictive autoscaling incorporates insights from past application behaviors, factoring in variables like time, day, and seasonality.
4. Resource and Custom Metrics
Azure Autoscale can be configured using both resource and custom metrics. Resource metrics are predefined measures like CPU usage or memory utilization, offering insights into performance. These metrics allow scaling based on system load, ensuring applications react to changes in usage. They provide a standard baseline for autoscaling.
Custom metrics offer more flexibility, allowing organizations to define unique parameters based on application-specific requirements. These could be user-defined measurements like transaction rates or latency, granting more precise control over autoscaling triggers. Custom metrics enable developers to tailor scaling mechanisms closely aligned with business objectives.
5. Scheduling and Rules
Time-based scaling in Azure Autoscale configures resources to scale at predetermined intervals, such as during peak usage hours. It factors in predictable increases in demand, such as business operating hours or promotional events. By adjusting resources based on time, organizations ensure applications operate smoothly during expected high-demand periods. Configuration involves setting predefined schedules based on anticipated workload patterns.
Rule-based scaling involves defining conditions where autoscaling actions are triggered. These rules can be based on performance metrics or custom criteria. For example, if CPU utilization exceeds 80%, additional instances are activated. These rules offer granular control, allowing scaling strategies that react precisely to current demands.
6. Autoscale Notifications
Azure Autoscale notifications serve as alerts that keep stakeholders informed when certain scaling actions occur. They enable transparency by providing updates on resource changes, ensuring IT teams remain aware of application dynamics. Configuring these notifications involves setting up alert policies that trigger when scaling events occur, such as adding or removing instances.
This immediate feedback allows organizations to quickly address unexpected changes or issues, maintaining uninterrupted service delivery. These notifications aid teams in understanding the effect of their autoscaling policies and making informed adjustments when necessary.

In my experience, here are tips that can help you better optimize Azure autoscaling:
- Use hybrid scaling strategies for better flexibility: Instead of relying solely on horizontal or vertical scaling, combine both to optimize costs and performance. Use vertical scaling for quick performance boosts and horizontal scaling for high availability. Automate vertical scaling through Azure VM Scale Sets with different instance sizes.
- Leverage Azure Monitor’s custom logs for scaling insights: Standard metrics like CPU and memory may not always reflect real-world performance needs. Use Azure Monitor’s custom logs to track deeper application metrics like request response times, database queue lengths, or user concurrency levels, and trigger autoscaling based on those.
- Utilize VM Spot Instances to cut scaling costs: For workloads that tolerate interruptions (batch jobs, background processing), mix Spot Virtual Machines with standard instances in Azure Virtual Machine Scale Sets. This significantly reduces costs while still benefiting from autoscaling.
- Apply cooldown periods to prevent rapid scaling fluctuations: Azure Autoscale reacts to metric changes, but without cooldown periods, it can scale in and out too frequently, leading to instability and excess costs. Set appropriate cooldowns to let new instances stabilize before triggering another scaling action.
- Use traffic-based scaling for web applications: Instead of CPU-based scaling alone, consider autoscaling based on HTTP request rates using Azure Application Gateway or Azure Front Door. This ensures web apps handle high traffic spikes efficiently without unnecessary resource allocation.
Tutorial: Getting Started with Autoscale in Azure
Azure Autoscale enables automatic resource scaling based on demand, helping to optimize performance and cost-efficiency. This tutorial walks through the steps to configure autoscaling for Azure resources using the Azure portal.
Reviewing Autoscale Settings
To view available autoscale settings in an Azure subscription:
- Open the Azure portal.
- Search for and select Azure Monitor from the top search bar.
- Select Autoscale to see a list of resources with autoscale capabilities and their current status.
- Use the filter pane to refine the list by resource group, type, or a specified resource.
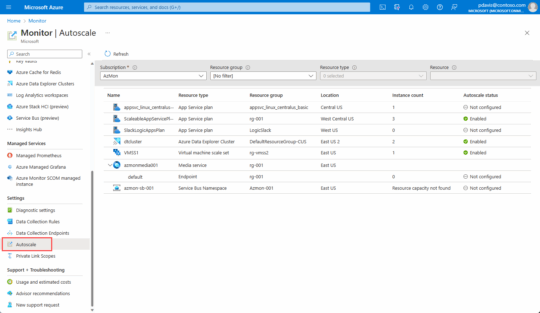
Source: Azure
The autoscale status for each resource can be:
- Not configured: Autoscale is not enabled.
- Enabled: Autoscale is active and managing resource scaling.
- Disabled: Autoscale is turned off for the resource.
You can also access scaling settings directly from the Scaling menu in each resource’s settings.
Creating an Autoscale Rule
To configure autoscaling for a resource, follow these steps:
- Open Azure Monitor > Autoscale and select the resource you want to scale.
- Click Custom autoscale and enter a name and resource group.
- Choose Scale based on a metric.
- Click Add a rule to define autoscale conditions. Set the metric (e.g., CPU usage), define thresholds (e.g., scale out if CPU > 70%), and specify the scale action (e.g., add 1 instance).
- To add a scale-in rule, repeat the process with lower thresholds (e.g., remove 1 instance if CPU < 20%).
- Adjust instance limits (e.g., set a max of 3 instances).
- Click Save to apply the autoscale settings.
Scheduled Scaling
Azure Autoscale supports scheduled scaling for predictable workload changes:
- Recurring schedules: Configure resources to scale at set times, such as reducing instances to one every Sunday.
- Event-based scaling: Define autoscale conditions for dates with higher or lower scaling limits (e.g., increase max instances to 10 during expected traffic surges).
To configure a scheduled scaling condition:
- Click Add a scale condition and enter a description.
- Choose a specific instance count or scale based on a metric.
- Define the schedule by selecting Repeat specific days or setting a Start/End time.
- Click Save to apply the schedule.
Monitoring and Notifications
Azure Autoscale logs all scaling activities in the Activity Log. You can:
- View the Run History tab to track past scale events.
- Check Autoscale settings in JSON to see or modify configurations directly.
- Configure Notifications to send alerts via email or webhook when autoscale events occur.
5 Best Practices for Effective Use of Azure Autoscaling
Here are some useful practices to consider when working with Autoscaling in Azure.
1. Provide Adequate Margins Between Maximum and Minimum Values
It is important to set adequate margins between maximum and minimum resource values in autoscaling configurations—these margins account for sudden demand spikes or drops, allowing applications to remain stable under variable conditions. Margin setting involves careful analysis of typical usage patterns to establish a range that accommodates peak loads without over-provisioning.
Evaluating historical workload data helps determine appropriate margins, balancing reactivity and stability in autoscaling. These margins must also align with budget constraints and expected performance levels, requiring continuous assessment and adjustment.
2. Use Scale-Out and Scale-In Rule Combinations
Implementing a combination of scale-out and scale-in rules ensures a balanced approach to autoscaling, allowing applications to respond flexibly to dynamic demands. These rules dictate resource adjustments based on specified metrics, ensuring resources match usage needs accurately.
Scale-out rules add resources in response to increased demand, while scale-in rules remove them during low activity. Effective rule combinations prevent over- or under-provisioning. Developers need to configure rules based on precise performance data, considering factors like response time, CPU usage, and traffic peaks. Testing these rules under various conditions ensures their effectiveness and helps prevent extreme fluctuations.
3. Considerations for Multiple Autoscale Profiles
Multiple autoscale profiles allow for diverse, context-specific scaling configurations tailored to different operational scenarios. Each profile defines scaling rules and metrics for various workloads or periods, such as peak business hours or testing phases. Implementing multiple profiles involves analyzing usage patterns to determine distinct scaling requirements.
Managing multiple profiles requires careful orchestration to avoid conflicts. Verify profiles don’t overlap by carefully scheduling their active periods or tying profiles to conditions. This practice helps maintain optimal configurations that adapt to requirements, maximizing efficiency and performance across different workloads and periods.
4. Selecting Safe Default Instance Counts
Setting safe default instance counts ensures baseline performance and availability before adaptive autoscaling takes place. Default counts act as a safety net, allowing applications to handle baseline traffic and unforeseen demand spikes. Configuring initial instance counts involves understanding minimum resource requirements to sustain application operations.
Establish baselines through testing and analysis of traffic patterns to determine reasonable default counts. Avoid overly conservative counts that waste resources or too low counts that risk underperformance. Regularly revisit and adjust these defaults based on evolving demands and operational insights.
5. Configure Autoscale Notifications
Configuring autoscale notifications allows stakeholders to receive real-time updates on scaling activities, fostering transparency and quick response to issues or unexpected scaling. These alerts inform administrators about scaling actions like resource addition or removal, helping application environments stay consistent and reliable.
Notifications are set up within Azure, where alert policies tied to scaling triggers help maintain operational awareness. Staying informed through these notifications aids in monitoring scaling effectiveness, optimizing configurations, and addressing anomalies. Tailor notifications to team members or channels to simplify response efforts and coordinate actions across departments.
Optimizing Costs in Azure Autoscaling with Umbrella
Azure Autoscale automatically adjusts your resources based on demand. This helps keep applications running smoothly during busy periods and saves money when traffic slows down. But without 100% visibility into the cost impact of these changes, it is easy to scale more than you need and overspend without realizing it.
Umbrella helps fill that gap with:
- See how scaling decisions affect your cloud costs in real time
- Understand historical trends to set smarter scaling rules
- Track which teams, products, or customers are driving autoscale activity
- Get alerts when costs spike unexpectedly or when scaling rules are not working well
- Check that your scaling settings match your budget and performance goals
Using Azure’s autoscaling features in conjunction with Umbrella’s cost insights provides a responsive and flexible cloud environment that remains efficient and cost-effective.